Using Exploratory Procedures to Build Tactile Skills

What are the exploratory procedures?
| Property | Exploratory Procedure |
|---|---|
| Texture | Lateral motion - scratching or rubbing |
| Hardness | Pressure - squeezing, kneading, and poking |
| Temperature | Static contact |
| Weight | Unsupported holding - waving, banging, transferring from hand to hand |
| Global Shape | Enclosure - clutching, grasping, and holding |
| Exact Shape | Contour - holding with one hand while following edge with fingers of other hand |
Why are exploratory procedures important?
It is critical that young braille readers begin to develop their tactile skills as early as possible. If they do not have a foundation for tactual exploration, they will have gaps in their braille reading skills. Many of these exploratory procedures are used to read braille and tactile graphics. Teaching them to young children who will be braille readers gives them a foundation for learning. Students with multiple disabilities, including deafblindness, also need to develop their tactile exploration skills. Tactile exploration allows the student to gather information about objects in their environments. Once the student can tactually identify an object, they can learn the object’s function, which is a goal of learning.
How can we teach exploratory procedures to our students?
Now that we know what the exploratory procedures are and why they are important, how can we teach them to our students? Below is a list of 10 strategies to use with students.
-
Set goals.
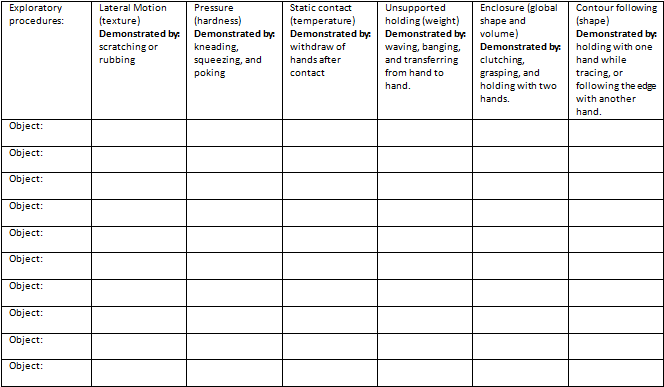
The following is a rubric I created to monitor the use of exploratory procedures. For some students the goal would be to master all the procedures for the maximum number of objects, and for others it could possibly be to master just one. It is very individualized.
-
Perform a Preference Inventory.
Know what types of objects your students like and do not like. Doe the student demonstrate an aversion to rough or sticky objects? Do they like smooth better? Knowing this will help you be more successful at teaching exploratory procedures.
-
Gather objects.
A LOT OF THEM. Many items are available at dollar stores. Use some familiar objects as well. I used objects I purchased, objects from around the pre-school classroom, and some of the student’s personal objects from home.
-
Set time aside just for exploration.
This is not a time to teach function of the object. That is important too, but this is the time for the student to use their hands simply to explore.
-
Get comfortable.
Find positions that work for you and your student. Many students will be tactually defensive. For these students, get in a position where you can use a lot of hand under hand assistance until the student wants to touch the object themselves. Take into account the student’s body; make sure they are well supported so they can focus on using their hands.
-
Make it routine.
Same place, same positon, same time. Collect the objects and have a clear beginning and end to exploration time.
-
Use sensory bins.
The use of sensory bins is helpful if you have a student who is willing to get messy.
-
Focus on one type of exploration at a time.
Once you are having success, incorporate exploration into every day routines, such as tooth brushing, hair brushing, and eating.
-
Make it fun!
My student loved music. I made up songs about what we were doing with our hands.
-
Incorporate some surprises.
An object that vibrates when squeezed, or jingles when shaken are great surprises for a student. Think about what your student does and does not like. For some students this would be scary, but for others it could be motivating!
References


Comments
Well done!