A Virtual Introduction to Braillewriters
Like many teachers of the visually impaired, I have often introduced people to Perkins Braillewriters. I’ve shown this tool to not only my students, but also to their families and their teachers and classmates if they are in inclusion settings. Face-to-face, this involves lots of visual strategies like “look at this key” and “watch me load the paper.” For people with visual impairments, I use tactile strategies like “put your hands over mine as I roll in the paper,” and for younger students, we “take a ride on my fingers while I press the keys for dots 1 through 6.” But how can this introduction be done virtually, where it can be challenging to demonstrate braillewriter functions visually on Zoom and impossible to do this tactually? Through my work with Perkins International, how can I make introductions to braillewriters accessible to countries around the world, as well as to the United States?
Words
Basically, we need to do it all with words, establishing a shared vocabulary then talking through the steps for loading paper, writing/reading while the paper is in the brailler, and unloading. Here’s the lesson I created for the Internet, and much of it for the telephone.
Shared Vocabulary
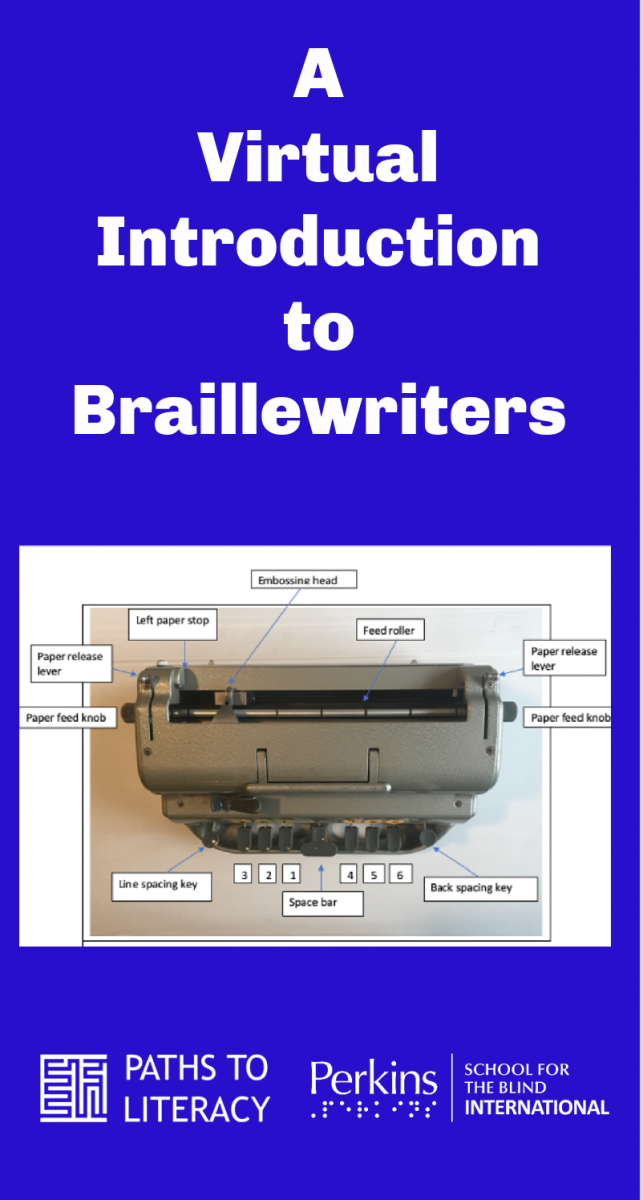
Establishing a shared vocabulary is a critical first step, so we’re not reduced to, “move the thing-y this way” or “put it under that.” (See my Paths post, “This, That and There.”) I needed to teach the names of key parts of the braillewriter for clear communication, and decided to use the brailler parts listed in the “Braille Writing Introduction” checklist in Getting Ready for Braille! (McCarthy & deWit, 2017). This list is paired with developmentally sequenced activities, so the parts would provide an integrated foundation for later instruction. I took a photograph of my own braillewriter, labeled most of these parts, and sent the labeled diagram by email to the person I’d be teaching. I asked him/her to print it out for reference and ideally to begin to memorize the parts or, if my student had low vision or blindness, to ask a sighted person to review them on an actual braillewriter. (If a sighted person hadn’t been available, I would have talked my student through verbally…….maybe that could be another Paths to Literacy post!)

The Set-Up
Picture the person I’m teaching at a computer (or on a phone) with a braillewriter in front of him or her and the labeled braillewriter diagram nearby or, better yet, now memorized. His device is linked with my computer by Zoom or its equivalent, or by telephone, and I have a computer and braillewriter in front of me, too.
I have one more tool: a printed paper entitled “Braillewriter Practice”. This paper itemizes an 18-step process of using the braillewriter: from loading … to writing/reading with the paper loaded….to unloading. (Some lovely task analyses of brailler loading and unloading are already available, such as the narrative and videotaped process in Paths to Literacy posted in June of 2020 Loading and Removing Paper from the Perkins Brailler: Video Demonstration. However, other published terms vary slightly from mine, which may be confusing, and I wanted to include a few additional steps.) To teach the lesson, I read the first step on my list and wait for the person at the other end to follow it, watching and further explaining or demonstrating on my braillewriter, as needed. Then I proceed to the second step, and so on. My preference is not to email this printed sequence before I teach the lesson. I’m already asking my learner to refer to the labeled braillewriter diagram, use the braillewriter, and listen to/watch me. It seems unnecessarily cumbersome to ask him to also read my 18 step instructions, although if this is his preference, I can certainly provide the written lesson then.
Loading
The first ten steps are loading paper in the braillewriter. The instructions are probably self-explanatory…except for the first step, “Find a position so the keys are lower than your elbows.” I’ve often seen people, especially young children, seated at braillewriters where the keys are at their shoulder height or nearly up to their chins. This positioning doesn’t enable them to use their core upper body strength in leaning into the keys in brailling. As a result, they tire quickly and may “ghost,” or write dots too weakly to be clear. So, right from the start, I teach people to find a position where their elbows are at right angles or greater (where the keys are lower than their elbows) so their writing is ergonomically efficient. Depending on the user and the setting, this may include using a higher chair, a lower table/desk, standing at the desk, placing the braillewriter on the lap, or sitting on the floor with the brailler between the legs. After this first step is finished, steps 2 through 10 are usually smooth sailing. I’m aware that people use varied sequences in loading paper. For instance, they may check the margin stops (steps #3 and #4 here) after they feed in the paper (step #7 here.) There’s flexibility in the list below.
Writing/Editing/Reading
Steps 11 through 13 provide some writing practice, pressing each of the dot keys from dot 1 to dot 6 with spaces between each, going to a new line, then pressing each dot key from dot 6 to dot 1 without spaces. Steps 14 and 15 give a sample of editing by crossing out with full cells then reading back the line while the paper is still in the braillewriter.
Unloading
Steps 16 through 18 give practice in unloading paper in a way that the braillewriter is ready to use the next time. This includes setting the embossing head to the far right so that the inner spring isn’t stressed by being contracted until the braillewriter is used again. Once these steps are completed, I email the list, if I haven’t done this already.
Follow-Up Post
Educators and children worldwide have shifted to remote learning. In our next post, my colleague Deborah Gleason and I share how Perkins International implemented this braillewriter introduction virtually with one of our international partners, supporting teachers and the children and families they serve across languages, time zones and cultures.
![]()
Braillewriter Practice
By Laurel J. Hudson, Ph.D.
Putting Paper in Braillewriter:
- Find a position so the keys are lower than your elbows.
- Press down the line spacing key until it’s firm.
- Check the margin stop on the left.
- Check the margin stop on the right.
- Bring the embossing head to the far left.
- Bring either paper release lever toward yourself.
- Start to feed in the paper, sliding it toward yourself and under the embossing head and the left paper stop.
- Bring either paper release lever away from yourself to lock the paper in.
- Roll in the paper with either or both paper feed knobs until it doesn’t go further.
- Press the line space (or down space) one time.
Writing, and Taking Paper out of Braillewriter:
- Press key 1, space, key 2, space, key 3, space, key 4, space, key 5, space, key 6 space.
- Bring the embossing head to the far left and press the line space one time.
- Press key 6, then key 5, then key 4, then key 3, then key 2, then key 1, with no spaces in between.
- Backspace 6 times until the embossing head is over the first cell in this line and press all 6 cells at the same time (“full cell”) 6 times.
- Press space bar one time, and feel how you have “covered” what you wrote on this line.
- Press the line spacing key (down space key) until it’s firm.
- Hold the paper with one hand, bring either paper release lever toward yourself, and take out the paper.
- Bring the embossing head to the far right so the spring inside the braillewriter is expanded. CONGRATULATIONS!